Life With Lipstick On

Food

Cinco de Mayo nibbles and sips

Food, PartiesLorely Meza1 Comment

We had so much fun putting together this fiesta for Cinco de Mayo featured last week on Inspired by This!  The girls love any chance to celebrate anything!  They were my helpers as we made our churros, chilled our mocktails and garnished our guacamole.  My hubby threw some steaks on the bbq and we enjoyed our snacks before dinner.  We wish you a safe and fun filled Cinco de Mayo! cinco collage

Photos: Corey Morgan

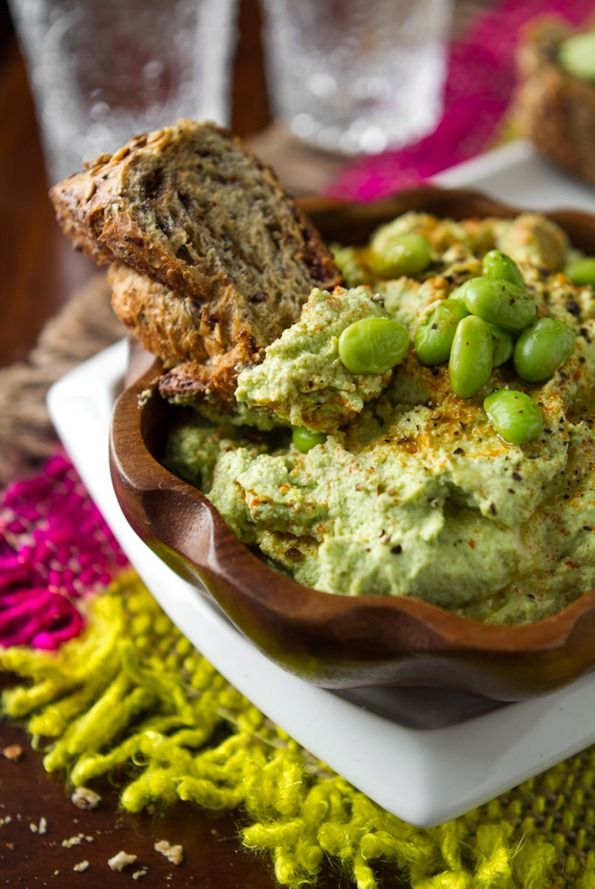
Goat Cheese, Mango and Pine nut Guacamole

you will need:

6-8 avocados

3 roma tomatos chopped

2 -3 T red onion finely chopped

1/2 Jalepeno pepper finely chopped

1 mango chopped

2 T cilantro roughly chopped

Juice of one lime

salt and pepper to taste

1 T toasted pine nuts

2 T crumbled goat cheese

to make:

Mash avoados.  Mix in tomatos, onion, jalapeño, cilantro, lime juice salt and pepper.Garnish with mango, goat cheese and pine nuts


Porch swing and Sun Tea

FoodLorely MezaComment

I came across this gorgeous porch with perfect swing and couldn't help but think of tea and summer.  It's heating up here in Cali and I've been hankering for sun tea.  My mom used to make batches of it with Nestea in the summer time when I was growing up and I wanted to make my own with some fun variations! porch 2

I found this great and super easy recipe on Free People Blog  and can't wait to give it a whirl!

You will need:

A glass jar with a lid (I used 24-oz. mason jars) Lemons Tea of your choice Fresh mint Distilled water

Sun-tea-ingredients

recipe and image via

What to do: 

1. Sterilize your jar by washing thoroughly with soap and water. Making sun tea provides an ideal situation for bacteria growth, so this step is very important!

2. Cut a lemon into slices. Add a few lemon slices and some mint to your jar.

3.  Add some tea bags to your jar, and fill to the top with distilled water. I made three types of tea: three mint, chamomile, and jasmine green tea. When it comes to the amount of tea bags, it’s better to use more than less. You can always water your tea down later if it’s too strong. I used 3 tea bags for each 24-oz. jar, and I felt that I could have definitely used another!

4. Set your jar outside in direct sunlight for at least 2 hours. The higher the temperature and brighter the sun, the faster your tea will be done.

5. Check your jar after a few hours. The darker the color, the stronger the tea will be. I left mine out in about 70-degree weather for about 5 hours, and the tea was the perfect strength for me

I want to try variations like, raspberry/ orange or blackberry.  So refreshing!!!  What variation would you try?

Coffee Cake

FoodLorely MezaComment
I have a couple girlfriends that just had their sweet little baby bundles arrive and I have been gathering my favorite comfort foods to deliver to their doors and snuggle those sweet little babes! I love bringing something sweet that can go as breakfast and as a treat that the hubbies will gobble up.  Enter the easiest and yummiest Coffee Cake!
COFFEE CAKE
1 yellow cake mix
1 pkg. instant butterscotch pudding
4 eggs
3/4 cup oil
3/4 cup water
1 tsp. vanilla
Beat 5 minutes and place in greased 9x13 pan.Mix together 1/2 cup sugar,2 tsp. cinnamon and 1/2 cup chopped pecans. Swirl this mixture thru batter and bake at 350 for 40 to 45 minutes.


Grasshopper Pie

FoodLorely MezaComment

Firstly, I'm sorry and you are welcome!!!  My mom used to make this heavenly treat when I was younger and it is still one of my all time faves and sooooo easy!  In honor of St. Patty's day, I thought I would share the yummiest frozen desert with you! You can of course get really fancy with this but I like to get to the eating party and whip mine up the simple way! grasshopper pie

image via

Grasshopper Pie

You will need:

1 Orea cookie pie crust ( in baking section of grocery store)

3 1/2 cups of chocolate chip mint ice-cream, softened

Whipped cream or 1 1/2 cup cool whip

To make:  spread softened ice-cream into pie crust.  Freeze for 3 hours. Remove pie from freezer 15 minutes before serving and top with whipped cream.  Voila!

Edamame Hummus

FoodLorely MezaComment

I got turned onto Edamame hummus from my dear friend Tiffany and it's been a problem ever since!  I dream of this stuff!!!  Because I knew I'd be going through this stuff to regularly I thought it was time to make my own! I wasn't alone is my obsession I found and turned to Oh She Glows for her take on this yummy snack! edamame hummus

image via


Edamame Hummus 

recipe from Oh She Glows


Yield: 2 heaping cups

Ingredients:

  • 1 (500g) bag frozen organic shelled edamame (equal to 3 cups thawed/drained)
  • 2 garlic cloves, peeled
  • 3-4 tbsp fresh lemon juice (I used 4T)
  • 1/4 cup tahini (stir well before measuring)
  • 2-4 tbsp water, to thin as needed (I used 3T)
  • 1/2-1 tsp fine grain sea salt, or to taste (I used 3/4 tsp)
  • 1/4 tsp ground coriander seeds, optional
  • 1/8th tsp cayenne pepper, optional
  • To garnish: smoked paprika, freshly ground black pepper, extra virgin olive oil, edamame


1. If starting with thawed edamame, rinse and drain before using. If starting with frozen edamame, simmer in a pot of water until edamame is heated through. Rinse and drain before using. You can also remove the skins of the edamame for a slightly smoother spread, but I didn’t bother. Set aside a handful of edamame beans for garnish just before serving.

2. With motor running on food processor, drop in 2 garlic cloves to mince.

3. Next, add edamame to processor and process until somewhat smooth, stopping to scrape down the side of the bowl as necessary.

4. Add in the lemon juice, tahini, and water and process again until smooth. Don’t be afraid to let the processor run for a few minutes and get it really smooth!

5. Add salt to taste along with optional cayenne pepper and ground coriander. Process again until combined.

6. Scoop into a serving bowl. Garnish with smoked paprika, freshly ground black pepper, a generous drizzle of olive oil, and reserved edamame. Serve with crostini, toasted pita chips, crudités, and/or crackers.


Clean and green

Beauty, FoodLorely MezaComment

If you aren't familiar with Candice Kumai you need to be!!! She is not only smoking hot, celebrity chef and fellow CSULB alum of mine, she is amazing in all ways!  I mean check out her abs!!!! She is the authority on food=sexy and talks often about certain foods that are great to enhance the "sexy time" if you know what I mean.  Okay, not the topic at hand but what I really mean to showcase today is her new 100 + smoothies! Her new book  "Clean Green Drinks" has been ordered and I can't wait for it to come!!!!  She makes things easy, pretty and sexy!  I mean, how much better does it get?! candice kumai smoothies


Candice is featuring her Clean Green smoothie and I wanted to share it with you all!


The Clean Green

Smoothie: Kale, Banana, Spirulina, Almond Butter

Serves 4

The Clean Green smoothie,  a delicious and vibrant am boost for you to stay lean and gorgeous! With filling fiber, an immunity boost from spirulina and fiber-boosting kale, you’re on your way to reclaiming your health. Go green!

1½ cups coconut milk drink or almond milk

2 cups kale greens

1 frozen banana

1 tablespoon spirulina

2 tablespoons natural almond butter

1 cup ice

Directions: Combine all ingredients in a blender and blend until smooth. Serve immediately.


CleanGreenDrinks_coverTRADE.indd

Happy Valentine's day

FoodLorely MezaComment

I surprised the girls this morning with fun heart pancakes!  Stuff like that rock's Capri's world and she was so excited!  Peyton just loves pancakes in any form! We quickly wisked off to school but it was a fun start to our Valentine's day!  I found these amazing heart molds and they make fun heart shaped pancakes so easily!  vday pancake cookingvday panckae pourvday pancake finished

No-Bake Chocolate Chip Granola bars

FoodLorely MezaComment

Since Capri has started Kindergarten my lunch and snack creativeness has needed some work!  I like to make sure I can give my girls healthy but super yummy snacks that are super easy to pack in her lunch pail.  Of course, they will eat three Chewy bars in one sitting but knew that I could find a healthier alternative for the prepackaged treats they love.  I landed on this beauty of a granola bar recipe from Lauren's Latest It's easy and quick and my girls are happy campers!  

granola bar

Image via Lauren's Latest

No-Bake Chocolate Chip Granola Bars

Healthier and cheaper than the store bought kind!

yield: 10 BARS

prep time: 2 HOURS INCLUDING COOLING TIME cook time: 5 MINUTES total time: 2 HOURS 5 MINUTES

INGREDIENTS:

1/4 cup butter 1/4 cup honey 1/3 cup packed brown sugar 2 cups quick cooking oats {not rolled oats!} 1 cup crispy rice cereal 1/2 teaspoon vanilla 2 tablespoons mini chocolate chips

DIRECTIONS:

In a large bowl, stir oats and rice cereal together. Set aside. In a small pot, melt butter, honey and brown sugar together over medium high heat until it comes to a bubble. Reduce the heat and cook 2 minutes. Pour in vanilla and stir. Pour over dry ingredients and mix well to moisten all ingredients. Pour into lightly greased small jelly roll pan {about 12x8x1} and press out to be about 3/4 inch in thickness. {If your pan isn't small enough, pack the mixture into one side. You really want to press them down so they stick together.} Sprinkle with mini chocolate chips and press down lightly. Cool on a countertop to room temperature for two hours or until the chocolate chips are set before cutting into bars. Wrap in parchment or plastic wrap and store at room temperature.

Recipe Notes: If your granola bars don't seem to be staying together when you cut them, you may have not boiled the mixture long enough...you want it to make it just past the softball stage. OR you made them too thin or you didn't pack them in tight enough. Stick them in the fridge for 20 minutes and that should help keep them together. {Be sure not to keep them in there too long or else they'll become super hard!} The next time you make them, try boiling for an extra 15 seconds or so.

Adapted from a recipe from Rachael Ray.


Hidden gems of OC for kids

Beauty, FoodLorely MezaComment

We spend a lot of time in Orange County and over time have found fun little hot spots that are perfect for the kids!

 Timree

chairs-for-blog-size

This adorable little painting studio is not only all things precious but is a perfect way to kill a couple hours with the kids and let them be creative.  Artist and owner Timree hosts classes and private parties for all ages.  She also has the sweetest items to purchase from custom paper goods to gifts.

Second….

Rosy Toes

rosy toes

One of the most special places in the whole world in my opinion is Balboa Island.  On the island is the cutest little mani/pedi salon called Rosy Toes.  It's pink walls and specialty services make it a real treat for my little ladies when they are getting their little piggies polished.  We won't go anywhere else!

Balboa Candy

balboa candy


This sweet little candy shoppe holds an vintage charm and every variety of candy you can possibly think of.  With barrel after barrel of different taffys to those hard to find specialty candies from my youth, this little gem has it all!  Talk about kids paradise!!

Laguna Beach tide pools

tide pools

I have the fondest memories as a kid of visiting the tide pools and seeing what sort of undersea life we could find.  It was always the best treasure hunt. The Laguna tide pools never disappoint!  Make sure to check out the tide schedule before you head out so you get there in the best timing to see some creatures.


Kale, apple and cucumber smoothie

FoodLorely MezaComment

Anyone else love Giada?  I have a million of her cookbooks and cook from them almost every other night!  She is a staple in my home!  This amazing green smoothie has quickly become my morning ritual.  Even my kids love it!  Vitamin packed and perfect for kickstarting your day! green smoothie

Photo via

Kale,Apple and Cucumber Smoothie

yeilds 2 1/4 cups; serves 2

1 cup ice

1/2 cup water

1 large apple, such as Fuji, peeled, cored and cut into 1/2 in. pieces

1 medium cucumber, peeled, seeded and cut into 1/2 in. pieces

4 large kale leaves, center rib removed

1 celery stalk coarsely chopped

Combine all ingredients in high power blender and blend on high speed until smooth.


This new book from Giada "Feel Good Food"  is so great~  It's packed with little tips and tricks to keep healthy and fueled up.  Beauty tips, food and fitness!  It's a must have in your kitchen!giada cookbook


Crepe Suzette

FoodLorely MezaComment

Our Christmas mornings were always full of presents, stockings and crepes!  It's one of my favorite Christmas traditions that my mom started when I was young.  I now carry on the crepe tradition for my little family!  We make a big heap of crepes and fill our tummies after opening our last presents.  Nothing yummier! orangecrepe

Image via


Crepe Suzette

You will need:

5 eggs

2T Sugar

2C Flour

1/2t Salt

2C Milk

To make:

Blend all ingredients until batter is smooth. Heat skillet on medium high.  Spray with cooking spray.  Ladle silver dollar size amount of batter into skillet.  Swirl batter in pan to evening coat skillet.  Batter should be a thin coat on skillet.  Cook until center is slightly firm about 30 seconds.  Flip and cook other side evening.  Serve hot.

We like our crepes rolled up and dipped in syrup and powdered sugar but you can top with anything you like.

Peppermint chocolate snack mix

FoodLorely MezaComment

Our tradition for the first week of December is long but one of our faves is to snuggle up and watch "Polar Express" with a special treat.  We are big peppermint fans in my house and this year I whipped up a new recipe, Peppermint Chocolate Snack Mix  for our movie night.  It was a hit! Peppermintchexmix_edited-1

Peppermint snack mix

you will need:

5 cups of Chex Mix cereal

1/2 cup crushed candy canes or peppermint candy

1 cup melting chocolate or chocolate chips

1/4 c powdered sugar


to make:

In a double broiler melt your chocolate, stirring often.  About 3 minutes. Once chocolate is melted, pour over cereal and mix thoroughly.  Fold in peppermint candies.  Transfer mixture to large ziplock baggie.  Add powdered sugar to bag and shake until evenly coated.  Enjoy!


Thanksgiving: Caramelized Onion and Carrot Stuffing

FoodLorely MezaComment

stuffing onion  


image: Better Homes and Gardens

We are spending Thanksgiving at my sister in law's home this year and I have volunteered to bring stuffing!  I love love love stuffing and wanted to bring a variety of types.  We are big eaters and my brother in law is already worried that we won't have enough stuffing!  It's his favorite!  I decided on a couple different recipes including this gorgeous one from Better Homes and Gardens.


Carmalized Onion and Carrot Stuffing

Prep: 30 min   Cook: 20 min

Bake: 45 min  Oven: 325 degrees


  • 1/4 cup  olive oil
  • 2 large sweet onions, coarsely chopped (2 cups)
  • 4 medium carrots, cut in chunks and/or slices (2 cups)
  • 1/3 cup  butter
  • 1/4 cup  coarsely torn fresh sage or 1 tablespoon dried sage, crushed
  • 1/2 teaspoon  kosher salt
  • 1/2 teaspoon  freshly ground pepper
  • 1 pound  sourdough bread and/or whole wheat bread, cut into 1-inch cubes (12 cups) and dried*
  • 1 - 1 1/2 cups  chicken broth
  •  Fresh sage sprigs (optional)
  • 1.In a 4-to 5- quart Dutch oven heat oil over medium-low heat. Add onions and carrots. Cook, covered, for 15 minutes or until vegetables are tender, stirring occasionally. Uncover; increase heat to medium-high. Cook for 5 to 8 minutes more or until onions are golden**, stirring frequently. Remove from heat; add butter. Stir until melted. Add 1/4 cup sage, salt, and pepper. Add bread; toss to combine. Drizzle with enough broth to moisten, tossing lightly to combine.

    2.Place stuffing in a 3-quart casserole. Bake, covered, alongside turkey for 45 to 60 minutes or until heated through. Or, use to stuff one 12- to 14-pound turkey. Garnish with fresh sage.

    from the test kitchen*

    • To dry bread cubes, spread cubes in a 15x10x1-inch baking pan. Bake in a 300 degrees F oven for 10 to 15 minutes or until cubes are dry, stirring twice; cool. Or let bread cubes stand loosely covered at room temperature for 8 to 12 hours.

    **

    • For extra golden color, add a sprinkle of sugar to the onion-carrot mixture after removing lid.

    To Stuff a Turkey

    • Spoon the stuffing lightly into the body and neck cavity of the turkey. (Spoon any remaining stuffing into a casserole and chill. Bake, covered, alongside the turkey for 40 minutes or until heated through.) Roast the turkey, adding an additional 15 to 45 minutes to the timing. Use an instant-read thermometer to make sure the stuffing inside the turkey is 165 degrees F.
    • Make Ahead:
      • Prepare as above and transfer mixture to the casserole. Cover and chill up to 24 hours. To serve, bake, covered, alongside the turkey for 60 minutes or until heated through.
      nutrition facts (Caramelized Onion and Carrot Stuffing)
  • Recipe and instructions from November issue of Better Homes and Gardens